Lovable Cloud Now Has Export, Pause and Remove (And It Might Make You Stay)
Fresh out of the oven: Lovable Cloud now has an official Export, an official Pause, and an official Remove. Thank you Lovable team for shipping this one. The community has been asking for it for a long time, and it landed better than I expected.
Some context on why I'm so happy about this: over the last months I've written several guides helping builders move from Lovable Cloud to their own Supabase. Back then there was no official path, so every migration was a creative, hand-crafted adventure. Now there's a real door, built by the Lovable team, and it works beautifully.
And so we're clear from the very start: Lovable Cloud is still my #1 option when I build in Lovable. Nothing in this guide is a goodbye. If anything, these buttons make me want to use Cloud MORE: now I can start every project there, enjoy the zero-setup magic, and know that if a project someday needs more control, the door to my own Supabase is official, tested, and easy. Best of both worlds.
Before recommending it to you, I did what I always do: I tested it for real. I built a demo app just for this, PlantSit, a little plant-sitting marketplace, and I loaded it on purpose with everything a real app has: 130 files, 12 tables, 237 rows of data, 23 users with their passwords, 40 images in storage, 5 edge functions, 2 scheduled jobs and a secret. Then I exported it, removed Cloud, and rebuilt the whole thing on my own Supabase, taking notes on every detail so your move goes even smoother than mine.
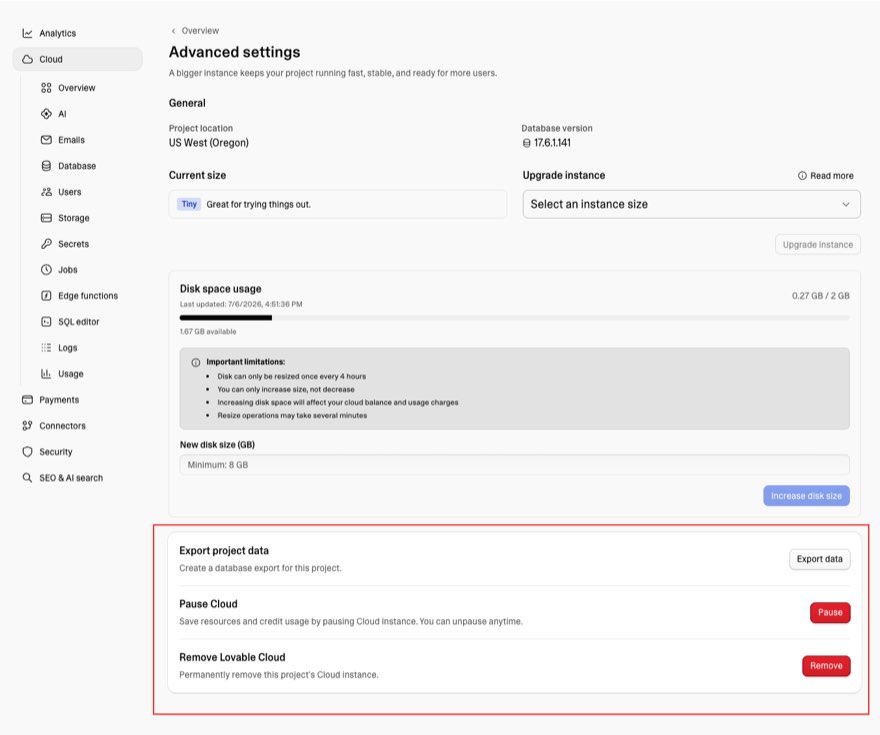
The three new buttons (one of them is yours)
Everything lives in Cloud > Overview > Advanced settings, and each button answers a different need. It's worth taking a second to see which one is actually yours:
Export project data creates a complete backup of your database, up to 5 GB, one export every 24 hours. And here's a use case I love that has nothing to do with leaving: you can export periodically as an off-site backup and keep building on Cloud exactly as before. If you've ever wanted a proper backup routine for your app, this quietly makes it possible. That alone is a lovely addition.
Pause Cloud puts your instance to sleep so it stops consuming your usage balance, and you can wake it up anytime. If your only concern is "my app uses credits while I'm not working on it," this is your answer, and you can stop reading after the next section. No migration needed.
Remove Lovable Cloud is for when your project is ready to run on your own Supabase. And just knowing it exists changes things: enabling Cloud is no longer a forever decision, it's simply where your project lives right now.
The rest of this guide is the full migration path, tested end to end. If you're staying on Cloud, take the export tip and the GitHub tip below with you, and enjoy the building.
Before you scroll: what follows is the manual path, every click explained, and it looks long because it's thorough, not because it's hard. If you'd rather not do it by hand, my migration skill packages this entire process, every step and every trap, and the Migrate with AI guide shows how to run it with claude.ai or Claude Code. Read on to understand the journey, and let the skill do the typing.
First, the map: what we're actually going to do
Before touching any buttons, let's look at the whole picture together, because "migrating" really means moving five different things, and each one travels in its own way. Once you see the map, none of the steps will surprise you:
| What | Where it lives today | How it travels |
|---|---|---|
| Your database (tables, data, and your users with their passwords) | Cloud's Postgres | The official export file |
| Your storage files (images, uploads) | Cloud's file storage | Download, then re-upload |
| Your edge functions | Their code is in your repo | Redeploy from the repo |
| Your secrets and API keys | Cloud's secret store | Re-enter them (they're protected, never exportable) |
| Your scheduled jobs | Inside the database | Recreate, with fresh URLs |
A good way to think about it: the official export is a wonderful package, and it carries the first row of that table completely. Here's what's inside the file, and why this list made me so happy:
- Your full schema: every table, index, sequence and extension, exactly as they are
- All your data: every row of every table
- Your security policies: RLS, the rules for who can see what in your database
- Your functions and triggers: the database logic your app relies on
- Your users, complete, with their password hashes
Let me pause on that last one, because it's the headline. Migrating users used to be THE hard part of leaving any managed backend. Password hashes are sensitive, so platforms rarely hand them over, and the usual "solution" was forcing every single user to reset their password after the move. If you have real users, that's not a migration, that's an apology email. The export includes the complete auth schema, hashes included, which means your users log into the new project with the same credentials they've always had, and they never even know the move happened.
The rest of our table (files, code, secrets) doesn't fit in a database export, on any platform, because it was never database content to begin with: files are files, code is code, and secrets are kept sealed on purpose. So we'll cover those parts ourselves along the way, and the whole journey looks like this:
| Step | What we do | Why |
|---|---|---|
| 0 | Connect GitHub | Your code, edge functions included, safe in your own repo |
| 1 | Export your database + download the file | The heart of your app, secured |
| 2 | Download your storage files | Images and uploads travel by hand |
| 3 | Create your new Supabase project | The new home |
| 4 | Load your database into it | One command, two quick checks |
| 5 | Upload your storage files | Your images come home |
| 6 | Redeploy functions + re-enter secrets | The last pieces settle in |
| 7 | Remove Lovable Cloud | Only now, with everything safe on the other side |
| 8 | Connect your own Supabase | And keep building, exactly like before |
(This post walks the general path, with nothing but your dashboard and a terminal. If you'd rather have help with the repetitive parts, my migration skill automates them, it's linked at the end.)
About the order we'll follow, because it's deliberate. We're going to secure everything first (your code, your export, your files), then build and fill your new Supabase, then verify it all works, and only at the very end will we remove Cloud. Why this way around? Because it means that at every single step of this guide, your app is still safely running on Cloud, untouched. Nothing gets removed until its replacement is already alive and verified. You're never in the air without a net, and if you need to stop halfway and continue tomorrow, everything just keeps working.
What you'll need (the ingredients)
A quick pantry check before we start, nothing exotic:
- Your Lovable project with Cloud enabled, plus a GitHub account for step zero (how the integration works)
- A Supabase account, the free tier is fine to start
- Your little inventory (next section, two minutes, it becomes your final checklist)
- For step 4 only: pg_restore, the standard Postgres tool, version 16 or newer (on Mac it comes with
brew install postgresql@18) - Optional but lovely: the Supabase CLI for steps 5 and 6 (bulk uploads and function deploys in one command), and the Lovable MCP + Supabase MCP if you'll let AI drive parts of the trip
- An unhurried hour. Cloud keeps running your app the whole time, so there's no clock pressure, you can even split it across days
And one reassurance before you scroll: this guide looks long because it's thorough, not because the migration is hard. Every step is small, and if you'd rather not do the technical parts yourself, AI genuinely shines here: my Migrate with AI guide runs this exact journey with claude.ai (no terminal at all) or Claude Code (everything automated). Keep it open as your copilot, or let it drive.
Ready? Let's start.
Step zero: connect GitHub (today, migration or not)
Our first move is about your code. Remember from the map that the export file carries your database but not your edge functions? Their code lives in your project's repository, so before anything else, we make sure that repository exists and is yours: we're going to connect your project to GitHub. This gives you a complete, always-in-sync copy of your app's code in your own GitHub account, which is both how your functions will travel later and, honestly, just a healthy thing for any project to have.
If your project isn't connected yet: open the menu next to the chat input (the + button), and there it is:
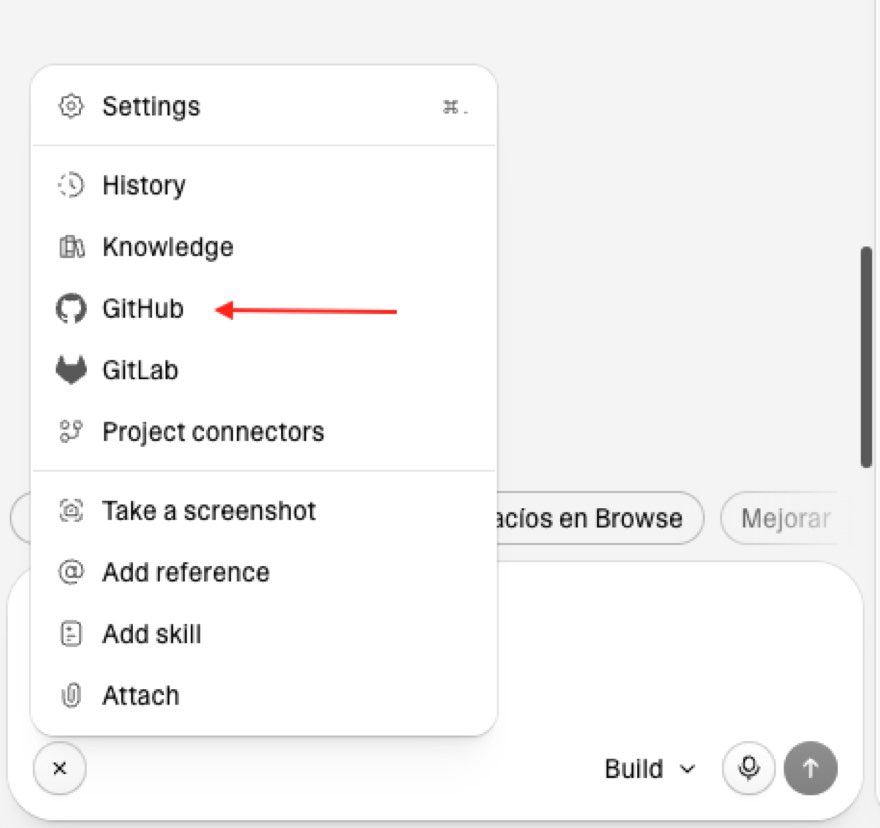
Choose GitHub > Connect, pick your account, and that's it. Lovable creates a repository and keeps it in sync with your project from then on.
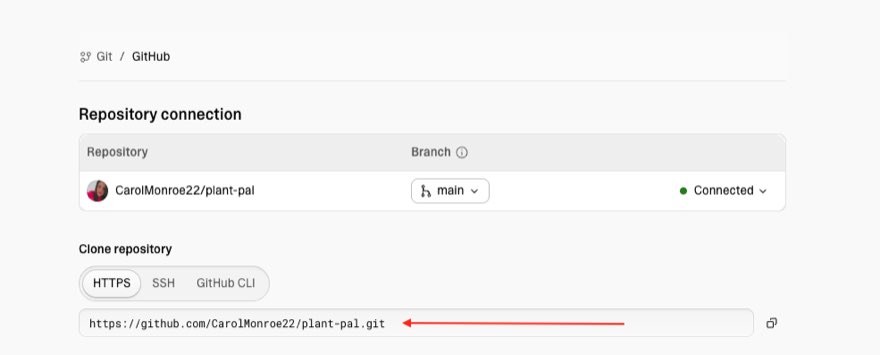
From this moment on, your app exists in two places, and everything we do in this guide happens with that safety net underneath. One click, a lot of peace of mind. (Your functions live in the supabase/functions folder of that repo, we'll come back for them in step 6.)
Know what you have: the two-minute inventory
Now a gentle two-minute task that will make you feel very in control later: a little inventory. The Cloud panel already shows you everything your app owns, so it's just a matter of opening each section and writing the numbers down:
| Panel | Write down |
|---|---|
| Database | Your tables and how many rows each has |
| Users | How many, and how they log in |
| Storage | Your buckets and how many files live in each |
| Edge functions | Their names |
| Secrets | Just the names (the values stay protected, that's a good thing) |
| Jobs | Your scheduled jobs, if you have any |
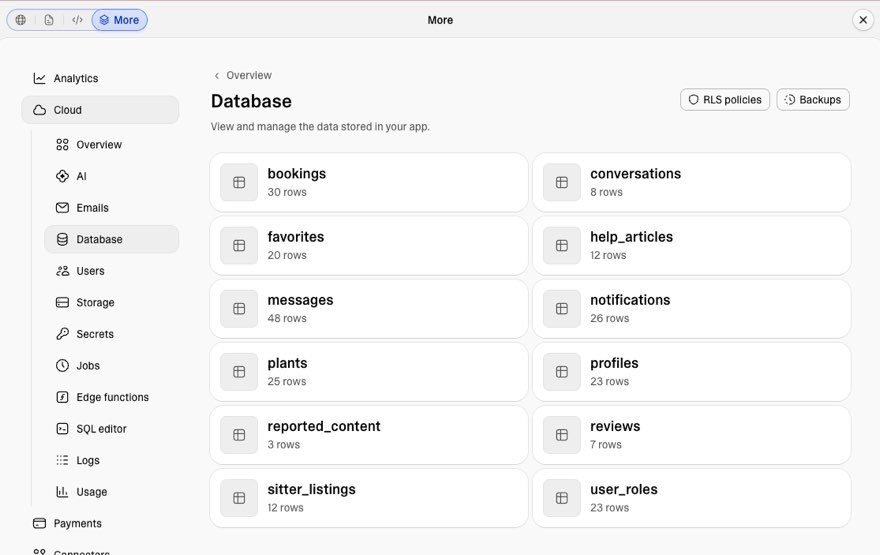
For PlantSit that came out to: 12 tables, 237 rows, 23 users, 3 buckets with 40 files, 5 functions, 1 secret, 2 jobs. This little list becomes your checklist at the end, when we verify that everything, absolutely everything, made the trip. That's the difference between "I think it worked" and the very nice feeling of "I know it worked."
Step 1: Export your database
Here we go. Cloud > Overview > Advanced settings > Export project data > Export data.
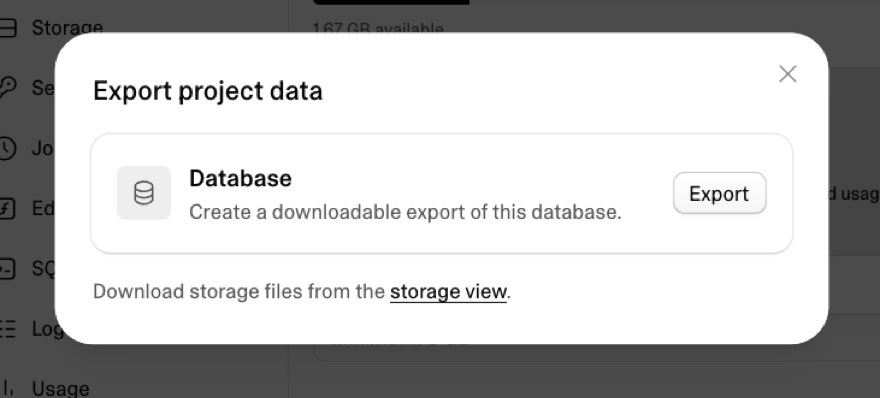
Lovable will email you a download link, and here's a friendly tip from testing it: you don't have to wait for the email. For my project, the export was ready in about a minute, and it appears right in your own Storage as a new bucket named something like database_export_06_07_26, with a .backup file inside. You can download it from there directly.
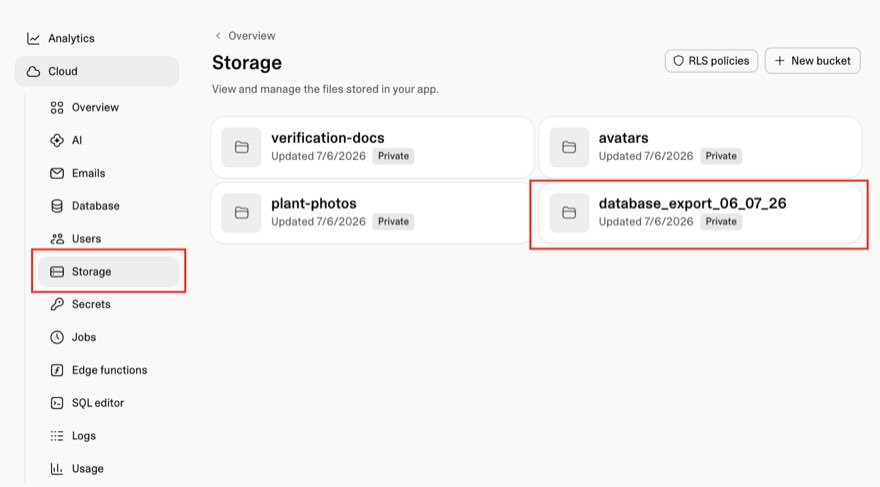
There's one ordering rule in this whole guide, and this is it, so let's give it its own paragraph: download your export (and your storage files) before removing Cloud. The export is stored inside your project's Cloud storage, so it travels with Cloud. The removal modal reminds you of this too, which I appreciated: export first, download second, remove much later, only when everything is safely on the other side. We'll get there calmly.
And a small care note: this file includes your users' password hashes and personal data. That's wonderful news for the migration, it's exactly why your users won't have to reset anything, and it also means the file deserves the same care as a password: keep it private, delete it when you're done.
What's inside the file? I opened mine and read the full contents, and it's genuinely impressive: your complete schema, all your data, all your security policies (RLS, the rules for who can see what in your database), your functions and triggers, your sequences, your scheduled job definitions, and the complete auth schema with password hashes. Your users will log into the new project with the same credentials they've always had. The Lovable team really did this one right.
What's not inside, by design: your storage files, your functions' code, and your secret values. Nothing alarming, those three simply don't live inside a database, anywhere. Each has its own easy path, and they're the next stops on our map.
Step 2: Bring your storage files home
Now, your images and uploads. First, a quick picture of how storage actually works, because it explains this whole step: when your app "uploads an image," the image itself is saved in Cloud's file storage, and your database only keeps a small record with its address, something like "the avatar for María lives at avatars/maria.jpg". The export file from step 1 carries those records, but not the images themselves. So the files make their own little trip, and it always goes through your computer:
Cloud storage  →  your computer  →  your Supabase storage
   (download)                         (upload, in step 5)
For now we do the first half, the download. Here it is, click by click:
- In the Cloud panel, open Storage. You'll see your buckets, the "folders" where your app groups its files. PlantSit had three:
avatars,plant-photosandverification-docs. Yours will have their own names, and they're all in your inventory from earlier. - On your computer, create a folder for this migration, and inside it, one folder per bucket, with the same names. This tiny bit of order now makes the re-upload in step 5 effortless.
- Open each bucket, and for each file: click the little menu next to it (the three dots) > Download. Save it into that bucket's folder, keeping any subfolders you see (if the bucket shows a
seedfolder, make aseedfolder). - If you see a bucket named like
database_export_06_07_26, that's your export from step 1 living in storage. You already downloaded that one, so you can skip it, it doesn't need to move to the new project.
When you're done, your migration folder should mirror what the Storage panel shows, something like this:
my-migration/
  avatars/
    seed/avatar-01.jpg ...
    sitters/...
  plant-photos/
    seed/plant-01.jpg ...
  verification-docs/
    seed/verif-1.txt ...
And the satisfying part: count your files and compare against your inventory. PlantSit's inventory said 40 files, my folder had 40 files, done. That number is exactly what we'll verify again on the other side.
(For projects with hundreds of files, downloading one by one stops being fun, this is one of the parts my skill automates. Don't let a big Storage panel discourage you, the trip is the same, just scripted.)
Step 3: Create your new Supabase home
Time to build the new home. In your Supabase dashboard: New project. If Cloud was your first backend, enjoy this form, it's your first taste of the extra control you're gaining, choices Cloud used to make for you:
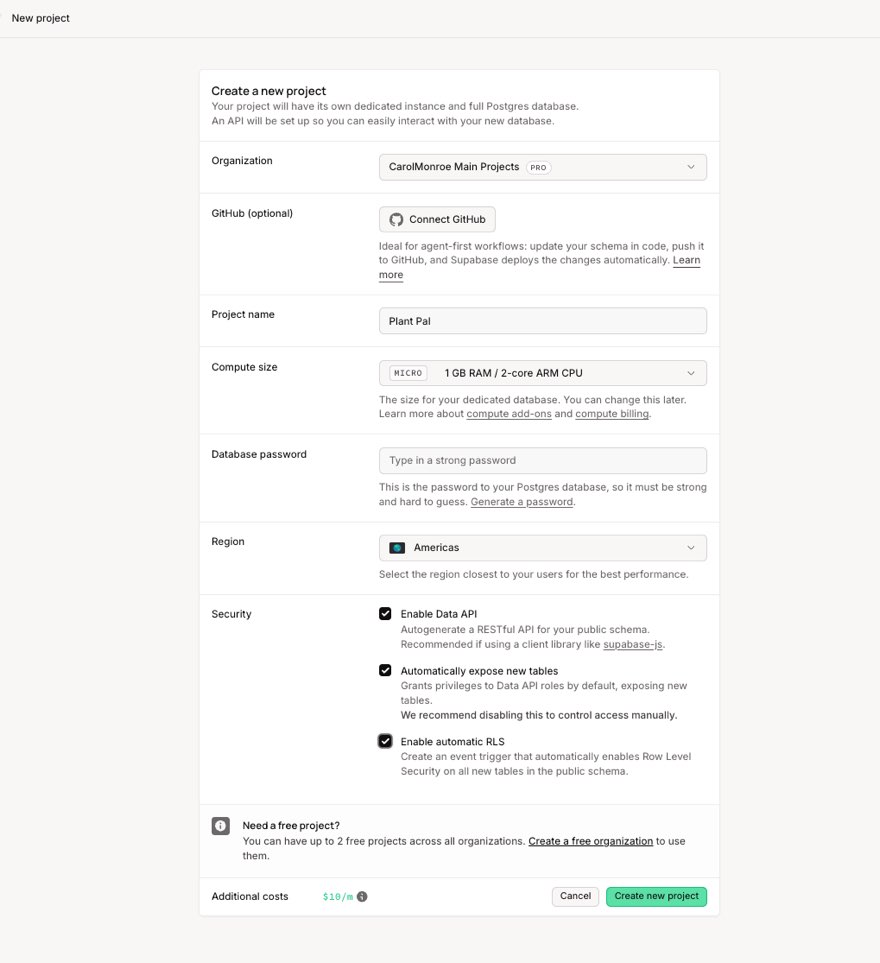
- Database password: generate one and save it somewhere safe, we'll use it in the restore step in a minute
- Region: pick the one closest to your users (your Cloud region is visible in Advanced settings if you'd like to match it)
- Compute: Micro is a great start, it can grow with you later
While it provisions, about a minute, click Connect in the top bar and find the connection string, the address we'll use to pour your data in. Two small notes here so nothing surprises you, both completely normal:
- If your password has special characters like
!, the connection string needs them percent-encoded (!becomes%21). The modal itself reminds you, with a link. - The "Direct connection" option uses IPv6, which many home networks don't speak yet. If it doesn't connect, simply switch to the Session pooler option in the same modal, it exists exactly for this, and works perfectly for our restore.
Step 4: Load your database into its new home
Quick honesty checkpoint before this step: this is the ONE moment of the guide that uses a terminal, because the .backup file only enters Supabase through a restore command. And if you're thinking "but the dashboard DOES have imports", you're right, and it's worth being precise: the Table Editor imports CSVs (one table at a time) and the SQL Editor runs pasted SQL. Both are real, both are older-guide territory, and neither can read a .backup file, it's a compressed binary, not text. More importantly, the CSV route can't carry your users' passwords, your security policies, or your triggers, which is exactly the treasure this new export file holds. That's why this step uses the restore command (or one of the alternatives below), and it's not me guessing: Supabase's own restore guide works the same way, even for their own backup files. Everything else in this guide is clicks. If terminals aren't your thing, you have two friendly alternatives, and both happen while Cloud is still safely running:
- Let AI run this step for you. In claude.ai, connect the Lovable and Supabase integrations (Settings > Connectors), open a chat, and ask:
Copy my Lovable Cloud database from my project [project name] into my
Supabase project [new project name]: schema, all data, RLS policies,
and auth users with their password hashes and identities. When done,
show me a table comparing row counts on both sides.
Claude reads from Cloud and writes to your new Supabase while you watch, and the row-count table at the end is your proof. Do this while Cloud is still running, it needs the source alive to read from it. And no, you don't need the Supabase CLI or anything installed: the two connectors are enough, they can even deploy your edge functions later.
Use the community's web exporter. There's a free, open-source tool (search for "Lovable Cloud to Supabase exporter") that moves database, users and storage files from the browser. It works well, just follow its cleanup steps at the end (delete the helper function it creates, rotate the keys you shared), since you're trusting a third party with your project's keys for the duration.
Or hand it to Claude Code. If you use Claude Code (or want a good excuse to try it), it can run this entire step for you, the restore, the checks, even the storage move and the function deploys. That's exactly what my migration skill packages.
(The full Migrate with AI guide is live: claude.ai route and Claude Code route side by side, with the updated skill and every prompt ready to paste.)
Whichever way your data crosses, rejoin us at the two checks below, they apply to every route. And if you're comfortable copy-pasting one command, stay here, it's genuinely one command. With your .backup file and your connection string (you'll need pg_restore, the standard Postgres tool, version 16 or newer):
pg_restore --no-owner --no-privileges \
  -d "postgresql://postgres.[ref]:[password]@[pooler-host]:5432/postgres" \
  your-export.backup
Run it from your terminal, from the folder where your .backup file lives (unzip the download first). One tooling note from my test: if the restore greets you with a zstd compression error even on a recent version (common with Homebrew's minimal Postgres tools on Mac), install the full postgresql@18 package and use its pg_restore, that build reads the export happily. Remember: this command IS the upload, there's nothing to do in the Supabase dashboard, and when it finishes you can see everything land in Dashboard > Table Editor, your tables, sitting there with their data.
Mine finished in 77 seconds. Now, before you run it, let me prepare you for something so it doesn't scare you: you will see errors scroll by, and that's expected and fine. Mine printed 290 of them. The reason is simple and kind of charming: your new Supabase project already comes with its own managed foundations (the auth system, the storage system), and the backup politely tries to recreate them, gets told "that's already here," and moves on. Your data lands perfectly around them.
That said, there are three spots worth a loving double-check afterwards. Each one takes a minute, each has a copy-paste fix, and this is exactly where your little inventory shines:
Check 1: your users' identities
Supabase keeps users in two tables that work as a pair: the users themselves, and their "identities" (how each user logs in). Let's make sure both arrived:
SELECT
  (SELECT count(*) FROM auth.users) AS users,
  (SELECT count(*) FROM auth.identities) AS identities;
Both numbers should match your inventory. In my test, my 23 users arrived perfectly but their identities needed a second pass, a small ordering quirk of the restore. If that happens to you, this one command completes the pair:
pg_restore --data-only -n auth -t identities -d "your-connection-string" your-export.backup
After that, I logged in with a migrated user and their original password, first try. Genuinely satisfying moment, I recommend savoring it.
Check 2: your scheduled jobs
If your app uses scheduled jobs (cron), their definitions came in the export, but the restore can't write them into their protected home, so we recreate them, which is quick. First enable the pg_cron extension (Dashboard > Database > Extensions), then in the SQL editor, one line per job:
SELECT cron.schedule('cleanup-read-notifications', '0 4 * * *',
  $$DELETE FROM notifications WHERE read = true
    AND created_at < now() - interval '30 days'$$);
And one detail worth a minute of your attention: if any of your jobs calls a URL (common for jobs that ping an edge function), that URL still contains your old project's address. Ten seconds of SQL shows you which ones:
SELECT jobname, command FROM cron.job WHERE command LIKE '%supabase.co%';
Whatever shows the old address, update it with cron.alter_job() pointing at your new project, and your jobs are as good as new.
Step 5: Upload your storage files (the ones from step 2)
Remember the files you downloaded in step 2? Their new home is ready: Dashboard > Storage. Your buckets already exist (the restore brought them), so it's just Upload, keeping the same folder structure. One small heads-up from my test: the restore also brought the RECORDS of your files (remember, the database keeps their addresses), so if an upload complains that "the resource already exists", delete those placeholder entries first from the Storage screen (select the files > Delete) and upload again. Same story if you see a database_export bucket in your brand-new project: it rode in with the records, feel free to delete it there too. With the Supabase CLI it's one command per bucket, and by hand it's drag and drop.
Then two happy verifications: your file counts match the inventory, and an image opens in the browser. And one last touch, because your data still stores some addresses that point to the old project:
SELECT count(*) FROM profiles WHERE avatar_url LIKE '%OLD_PROJECT_REF%';
If anything matches, a simple UPDATE with replace() refreshes them. (One nuance: "signed URLs", the long ones with ?token=, are tied to the old project by design, those rows want fresh URLs from your new project instead of a text replace. Your app most likely regenerates them on its own.)
Step 6: Redeploy your edge functions
Your functions' code has been waiting patiently in your repo since step zero. Three lovely ways to bring them to the new project, pick whichever feels like you:
By hand, one at a time: open each function's index.ts in GitHub, copy it, then Dashboard > Edge Functions > Deploy new function > paste > Deploy. While you're in the repo, peek at supabase/config.toml: functions marked verify_jwt = false (usually webhooks) want that same setting in their new home.
All at once with the Supabase CLI:
supabase functions deploy --project-ref YOUR_REF --workdir path/to/your/repo
The CLI reads the config on its own and handles shared code folders, very satisfying to watch.
Or simply ask Lovable. Once your own Supabase is connected (step 8), the Lovable agent can deploy your edge functions for you, I asked it directly and it confirmed, config.toml settings respected and everything. So if the terminal isn't your happy place, skip this step for now and, right after step 8, send:
Deploy all edge functions from supabase/functions to the connected
Supabase project, keeping the verify_jwt settings from supabase/config.toml.
Don't modify their code.
The only trade-off: your functions come online a few minutes after the switch instead of before it. For most apps that's completely fine, just know it's the one difference with the other two routes.
Your functions are deployed now, but most of them are waiting for one more thing before they can actually work: their secrets. That deserves its own section, because it's the one part of the migration that only you can do.
Your secrets: the one part only you can do
Let's talk about secrets properly, because this is where a beautiful migration can quietly end with "why is my payment webhook not working?", and it's entirely avoidable.
Secrets are the keys your app uses to talk to other services: your Stripe key for payments, your Resend key for emails, a webhook signing secret. Your edge functions read them by name when they run ("give me the key called STRIPE_SECRET_KEY"), and their values never travel in any export, which, once you think about it, is exactly what you want: it's the export respecting your security, not a gap in it. Here's the whole topic in one view:
| What travels | Only the NAMES (visible in Cloud > Secrets, they're in your inventory). The names are the shopping list |
| Where the values come from | Each provider. My tip: don't hunt for the old values, generate fresh keys (Stripe, Resend, etc.), same five minutes plus free security hygiene |
| Where they go | Supabase Dashboard > Edge Functions > Secrets, one by one |
| The one rule | Names must match EXACTLY, capitalization included, functions ask for them by name |
| If you miss one | The app works except one feature (payments fail, emails don't send). Check that function's Logs, the error names the missing key, add it, no redeploy needed |
| Don't copy these | SUPABASE_URL / SUPABASE_ANON_KEY style keys, your new project provides them automatically |
| Lovable AI key | Happier special case, see the bonus after step 8 |
Step 7: The moment: Remove Lovable Cloud
Take a breath, look at your inventory, and check: database restored and verified, files uploaded and opening, functions deployed, one real login tested. All green? Then your app already lives fully on your own Supabase, and Cloud has been your safety net this whole time. There's genuinely no rush, some people sit at this step for a few days, and that's completely fine.
When you're ready: Advanced settings > Remove Lovable Cloud. Two checkboxes, type the project name to confirm, and thank it for its service.
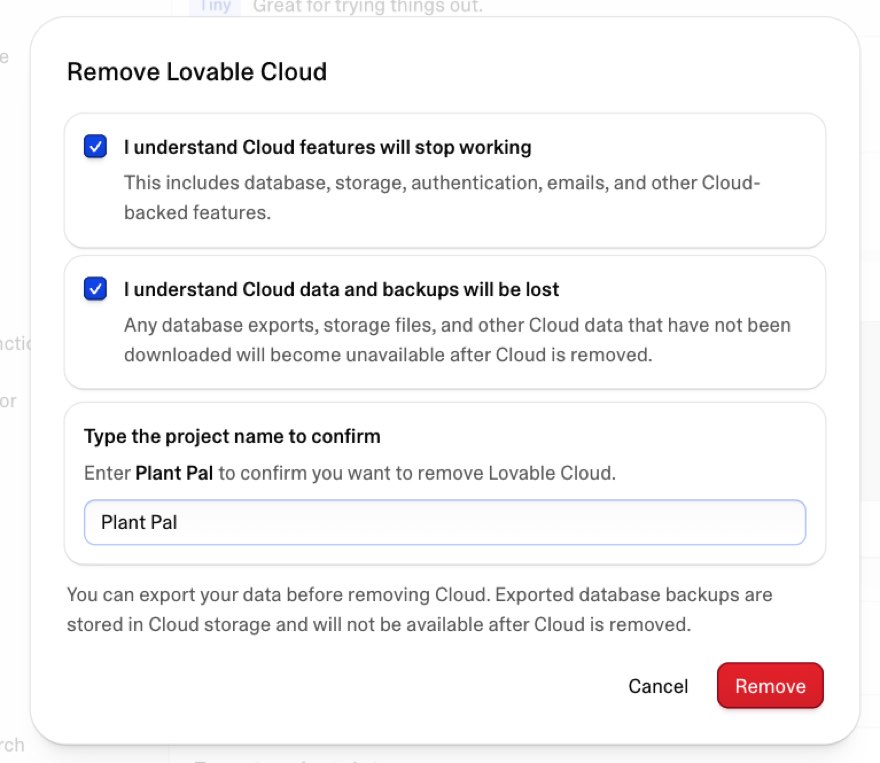
And with that, this chapter closes. Everything your app is, its data, its users, its images, its functions, now lives on infrastructure that belongs to you, and the Cloud instance that carried it this far can rest. If you've been following along, notice what just happened: you moved an entire production backend, and at no point was anything at risk. That's what the preparation was for.
One thing left, and it's the happy one: introducing your app to its new home.
Step 8: Connect your own Supabase, and meet the new panel
Back in the editor, the Cloud tab has transformed, and at the bottom sits exactly the link we want: "Already have a Supabase project? Connect it here."
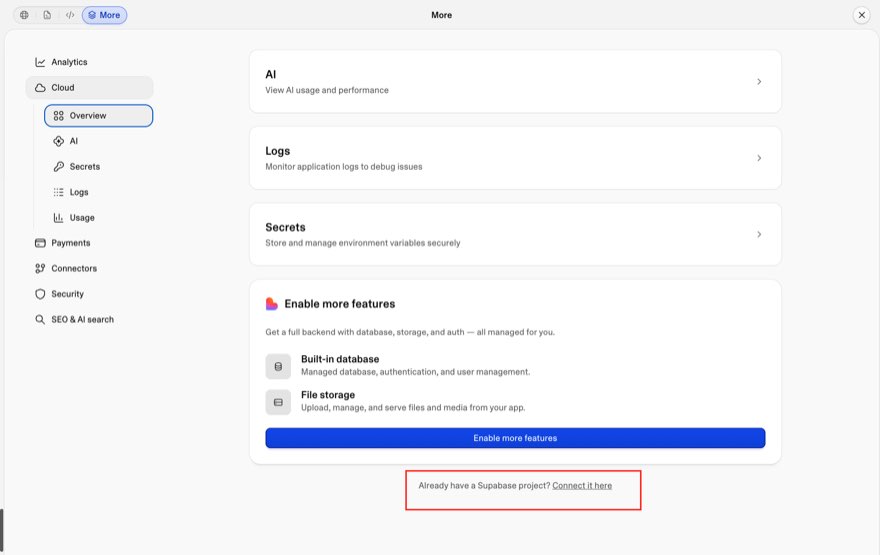
Click it, authorize your Supabase organization, pick your new project, Connect.
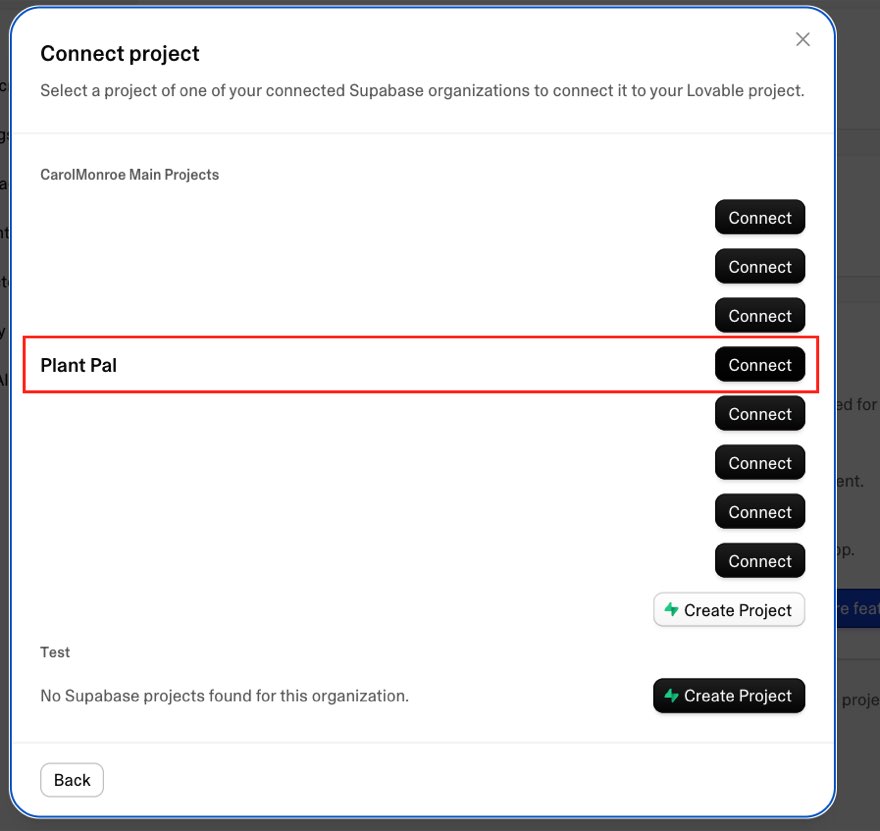
And here Lovable does something genuinely helpful, invisibly: it rewrites your project's .env file, the six lines of configuration that tell your app where its backend lives, with your new project's address and key, automatically. You don't edit anything. If you're curious, you can see it happen in your GitHub history: old address out, new address in.
In my test there was one moment where the preview showed an error page right after connecting, the integration had refreshed a config file with a template my project's setup didn't love. If that happens to you, nothing is wrong and nothing is lost, it's exactly what the next prompt untangles.
Leave your Lovable agent this prompt after connecting. It asks for a report first, and the "important context" lines are there because Lovable's agent is a very eager helper, and we want to make sure it knows the database is already beautifully migrated:
Review my Supabase connection: confirm the app points to my new Supabase
project, check that auth, database queries, storage and edge functions all
work against it, and list anything still referencing the old backend.

Important context: the database, users, storage files and edge functions
ALREADY EXIST in the new project, they were migrated. Do NOT create tables,
run migrations, or re-seed data. Fix wiring only.
One rebuild later, my app was alive on my own Supabase. Same users, same passwords, same images. It's a really nice screen to look at:

Bonus: your Lovable AI features come along too
I assumed AI features would be the one casualty of the move, and I was happily wrong. The LOVABLE_API_KEY your AI features use is a workspace-level key, independent of Cloud, and it's still yours after the move. If your AI calls lived in edge functions, they just need a little re-wiring: either copy the key into your Supabase secrets, or ask the agent to move those calls into a server function, where the key is already available. My demo's AI feature works great post-migration with the second option. A very pleasant surprise.
Tidy up, like a pro
Three small finishing touches:
- Remove any temporary helpers. If you deployed a helper function for the move, remember it also lives in your repo, so peek at your new project's Edge Functions list and tidy it there too.
- Refresh your database password if it touched a chat or a script during the migration (Dashboard > Settings > Database). Thirty seconds, total peace of mind.
- Recreate your social login settings if you use Google or similar (Dashboard > Authentication > Providers, plus redirect URLs). Email and password users are already perfect.
The final checklist: your victory lap
Your inventory, one last time:
□ tables match          □ auth users match      □ files open in browser
□ row counts match      □ auth identities match □ zero old URLs in data
□ RLS policies match    □ one real login works  □ jobs running, fresh URLs
□ functions deployed    □ secrets re-entered    □ AI re-wired (if used)
Mine came back 12 for 12, with a real login on an original password. That's the moment the migration is truly, provably done. Take the screenshot, you earned it.
Questions from the community
These came up when I shared the short version on Reddit, and they're probably your questions too:
Can I still edit my project in Lovable after moving to my own Supabase? Yes, exactly like before. During the migration itself (between Remove and Connect) it's best to let the project rest, but once your Supabase is connected you keep prompting, editing and publishing completely normally. Hosting on Lovable doesn't depend on Cloud either.
Does the export/remove/connect flow cost credits? No, the buttons themselves are free. Only regular agent prompts (like the verification prompt) cost what prompts always cost.
Can I export WITHOUT removing Cloud? Yes, and I'd encourage it! The export works on its own, one per 24 hours, which makes it a lovely periodic backup habit while you keep building on Cloud.
What if my database is over 5 GB? The built-in export currently caps at 5 GB. Write to support@lovable.dev with your project ID, and for now the MCP-based route handles large databases nicely.
What about my integration keys and secrets? They don't come in the export, and that's a security feature, secrets never live in databases. Keep a list of their names, then grab fresh values from each provider when you arrive.
Why this actually matters
This changes how I think about Lovable Cloud, and probably how you should too.
Lovable Cloud is genuinely good, and not just for small projects: auth, database, storage, edge functions, all working out of the box with zero keys to manage. The thing that made some builders hesitate was never the product, it was the permanence: choosing Cloud felt like a decision you couldn't revisit, so many of us defaulted to our own Supabase "just in case."
That trade-off is gone now. Start fast on Cloud. Export as a backup habit while you grow. Pause when you need a break. And if your project someday outgrows it, the door is right there, official and well-made: export, download, remove, connect, restore, verify.
Honestly, I might use Lovable Cloud more now, not less. That's what a good exit does: it makes staying feel like a choice. Thank you again to the Lovable team for this one.
The official docs, for your bookmarks
| Topic | Link |
|---|---|
| Lovable Cloud: export, pause, remove | docs.lovable.dev/integrations/cloud |
| Supabase: migrating within Supabase | supabase.com/docs/guides/platform/migrating-within-supabase |
| Supabase: restoring a dashboard backup | supabase.com/docs/.../dashboard-restore |
| Supabase: database backups | supabase.com/docs/guides/platform/backups |
| Supabase: storage | supabase.com/docs/guides/storage |
| Supabase: edge function secrets | supabase.com/docs/guides/functions/secrets |
Tested end to end on July 6, 2026, on a real project with real data: 12 tables, 23 users, 40 files, 5 edge functions, 2 scheduled jobs, all accounted for on the other side. My earlier migration guides remain useful for deep details and large projects, and they now carry update notes pointing here. The updated migration skill, with the scripted storage move and the verification queries ready to paste, is on my GitHub.
Reader margin
What stayed with you?
Leave one small mark in the margin.
Notes from readers
Stuck with something like this? I fix it daily → Services
Thank you very much for this guide! Greetings from Mexico.